

 App Store

App guides
How to Organize Your Coin and Banknote Collection with HeriBase
Follow a practical HeriBase collection workflow: identify, verify, save, group, record costs and export, using real screens from existing guides.
 HeriBase TeamPublished
How do I organize a coin and banknote collection?
Use HeriBase to identify an item, verify the suggested match, save it to Collection, assign it to a personal set, record what you paid and export your records when your plan includes that benefit. Keep your own purchase cost separate from the app’s reference value. A useful collection record connects the item’s photos and identity with its set, acquisition details and notes.
Your identification history, collection records and subscription benefits follow your account. Sign in with the same account after changing phones, including moving between Android and iPhone. Contact support if records or paid access do not appear. After membership expires, existing collections and identification history remain viewable, but premium features such as export are unavailable.
This walkthrough reuses real screens from our existing guides. The 1942-S cent screens show a saved-record workflow; other screens illustrate collection controls, banknote identification and export. They are examples from different records, rather than a new end-to-end performance test.
1. Identify the item and check the match
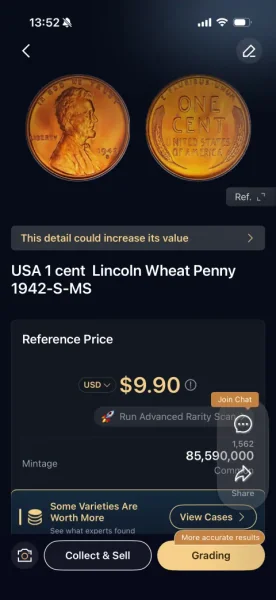
Start with a record you can trust
Photograph both sides of your coin or banknote. For the coin example, check the Lincoln Wheat design, the 1942 date and S mint mark against the item in hand before saving. Verify any variety or condition label separately.
For a banknote, compare the denomination, printed series and serial characters with the actual note. Similar designs can cover multiple issues. Our identification results guide explains the fields and real mismatch examples.
Result: you have a checked starting identity and photos, rather than an unchecked scan stored as a fact. If a result remains wrong after clearer photos, contact support before relying on its price.
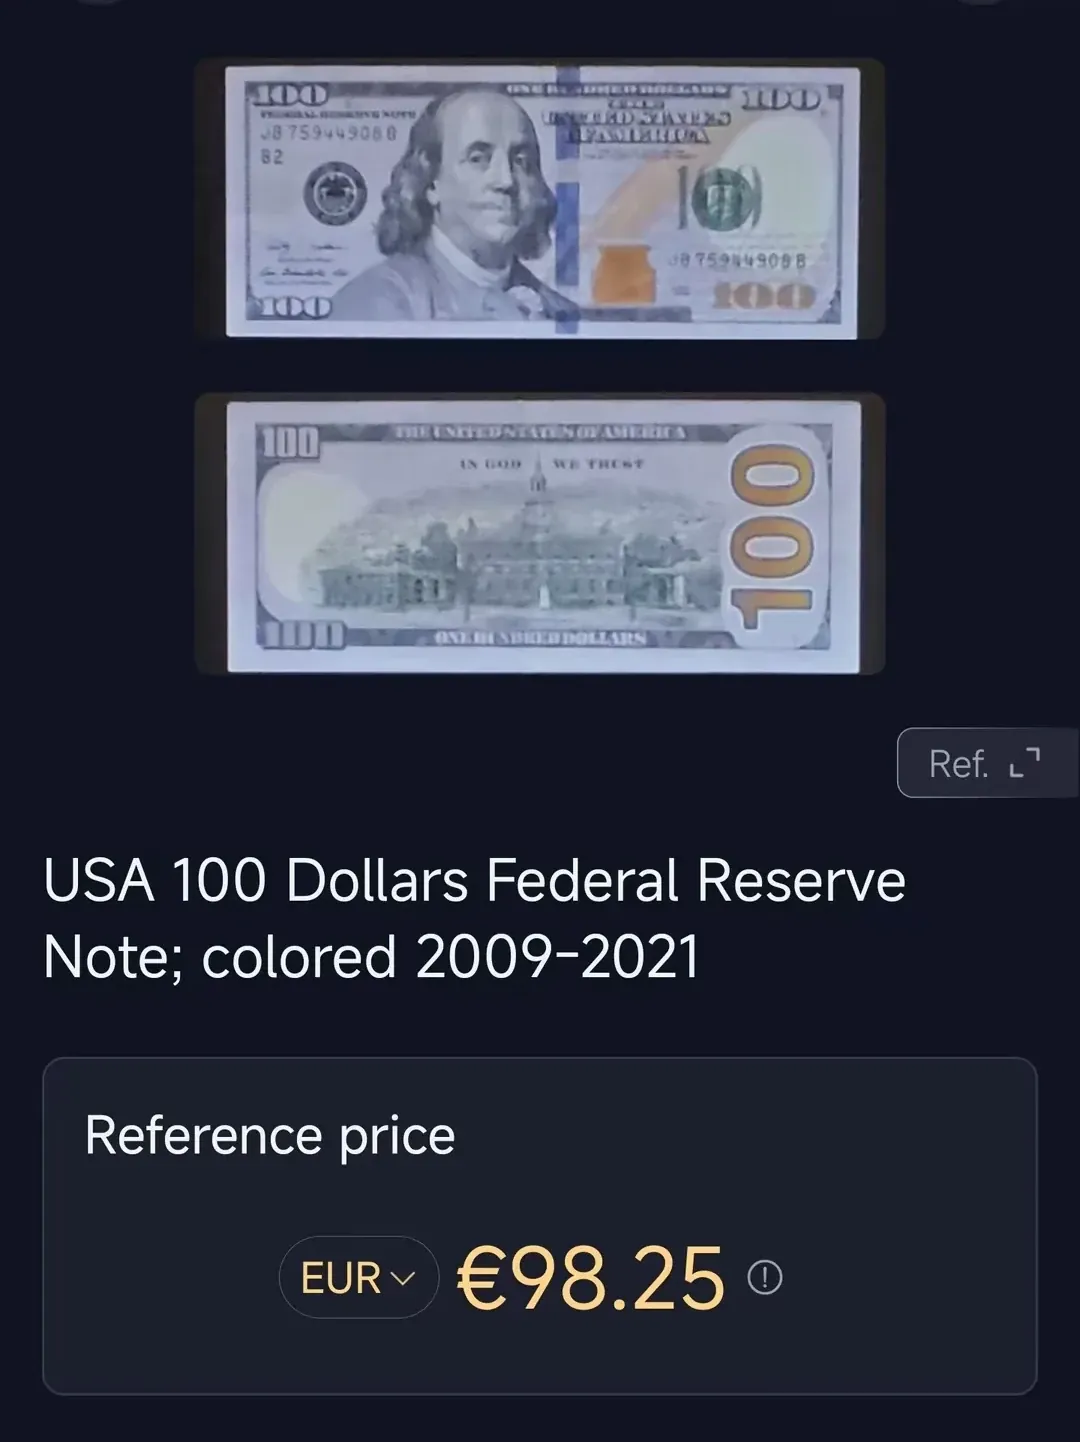
Use the same verification habit for banknotes
The existing banknote example shows a U.S. $100 Federal Reserve note. Read the printed series directly from the note and check every serial character. The date range in a catalog title is not necessarily the specific series printed on your note.
Note folds, stains and tears in your own record. A reference price is a research starting point; it is neither your acquisition cost nor a guaranteed sale price. See how to research a banknote’s value.
2. Save the checked item to Collection
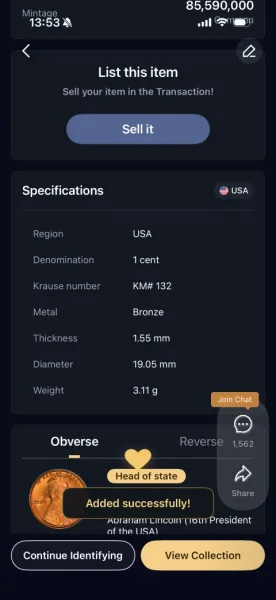
Turn an identification into a saved item
On the identification result, tap Collect & Sell and choose the collection option. Review the details and save. Then open Collection to verify that the item appears.
Identification history and a deliberately organized collection serve different purposes. History lets you revisit scans; a collection record gives you a place to maintain ownership information and grouping.
Result: the saved item is available to review and edit. Check that the photos belong to the correct physical item, especially when you own duplicates. For individual controls, see the collection walkthrough.
3. Put the record into a meaningful personal set
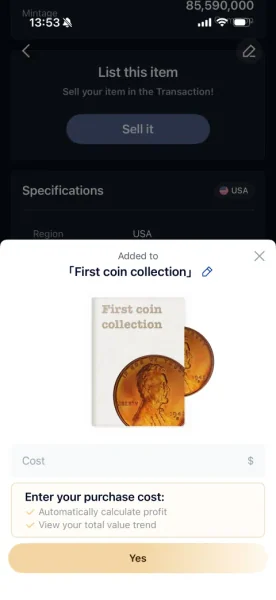
Use a small, practical classification
Open Collection → + Create to name a personal set. In the saved item’s editor, select the appropriate Custom Set and tap Update Collection. The historical example uses “First coin collection.”
For your own collection, choose a system you will remember: a coin series, banknotes from a trip, or inherited pieces awaiting research. These are suggested organizing themes, not preinstalled folders.
Use notes to connect a digital record with its album page or storage location. Distinguish two examples of the same issue with your own notes and photos.
Result: the record has a retrievable home. Personal sets organize your saved items; catalog or official-series groups help explore a series and are a different view.
4. Record purchase cost and acquisition details
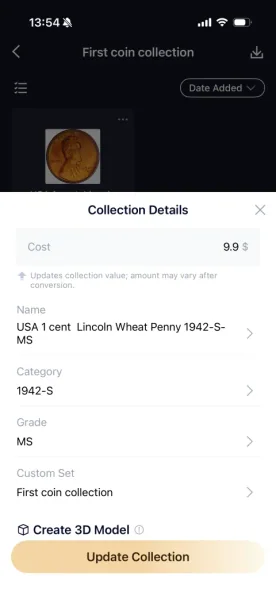
Cost is what you paid
The saved 1942-S cent example shows Cost: $9.9, its name, category, grade and personal set. This is a value entered in that record, not evidence of an auction sale or a recommended purchase price.
Open the item menu, choose Edit, enter your actual cost and check the currency shown. Update the assigned set or identity where needed, then save. Avoid copying the app’s reference price into Cost unless that is what you actually paid.
For a gift or inherited item with unknown cost, preserve that uncertainty in your notes. Do not invent a purchase amount just to fill the field.
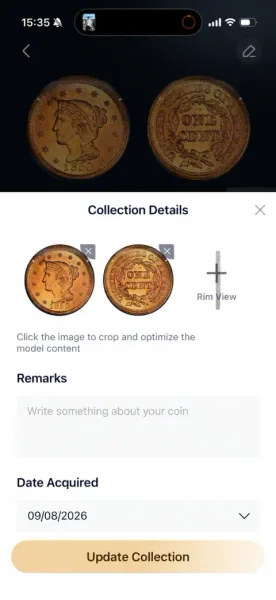
Keep the story with the item
The additional fields screen shows Remarks and Date Acquired. Record where the item came from, a receipt reference, its storage location and anything still awaiting verification.
For banknotes, useful notes include the printed series, confirmed serial and visible condition concerns. Store only details you have checked; an interesting serial pattern alone does not establish value.
Result: the record explains what you own, where it belongs and what you know about its acquisition. The illustrated editing fields are coin screens; the banknote editor’s exact field arrangement may differ.
5. Review the collection without confusing value and profit
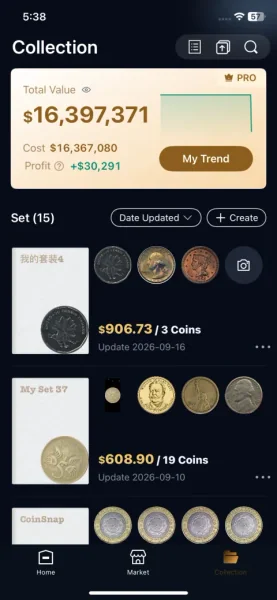
Use the overview as a review tool
Collection brings together Total Value, Cost and Profit, alongside sets and the available My Trend control. Review individual records when a number looks unexpected; a missing or incorrect cost can make the comparison less useful.
The overview is not a completed sale. Displayed value and profit figures do not establish money you could immediately withdraw or the amount a buyer will pay. Sale fees, condition, the exact issue and buyer demand still matter.
Result: you can revisit grouped records and spot details that need correction. Use comparable completed sales when researching a possible sale.
6. Export a copy when your plan includes it
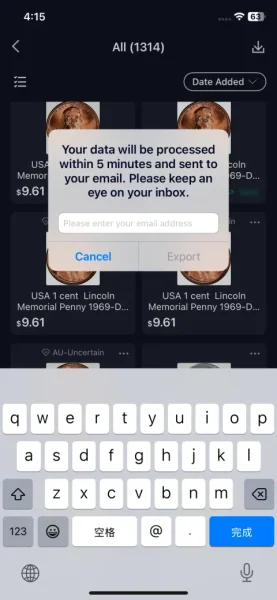
Finish with a usable copy of your records
- Open the collection list and tap the download/export icon at the top right.
- Enter the email address that should receive the export and check it carefully.
- Tap Export, then check your inbox and spam folder.
- Open the delivered file and check that the expected records and useful details are present before treating it as your saved copy.
The illustrated prompt mentions processing and delivery within five minutes. If the email does not arrive, contact support. This screen shows the request process; it does not demonstrate the contents of a delivered file or a completed export test.
Check access first: the supplied Pro Center marks spreadsheet export Annual only. Verify your current plan in Pro Center and read the subscription benefits guide. Export is unavailable after premium access expires.
How to organize a larger collection: a photo-import case
Owner-reported result: 20 mixed coin and banknote items imported successfully from phone photos, with no failed or duplicate records. The supplied screens show selecting photos, upload and processing, completion controls and the resulting collection view.
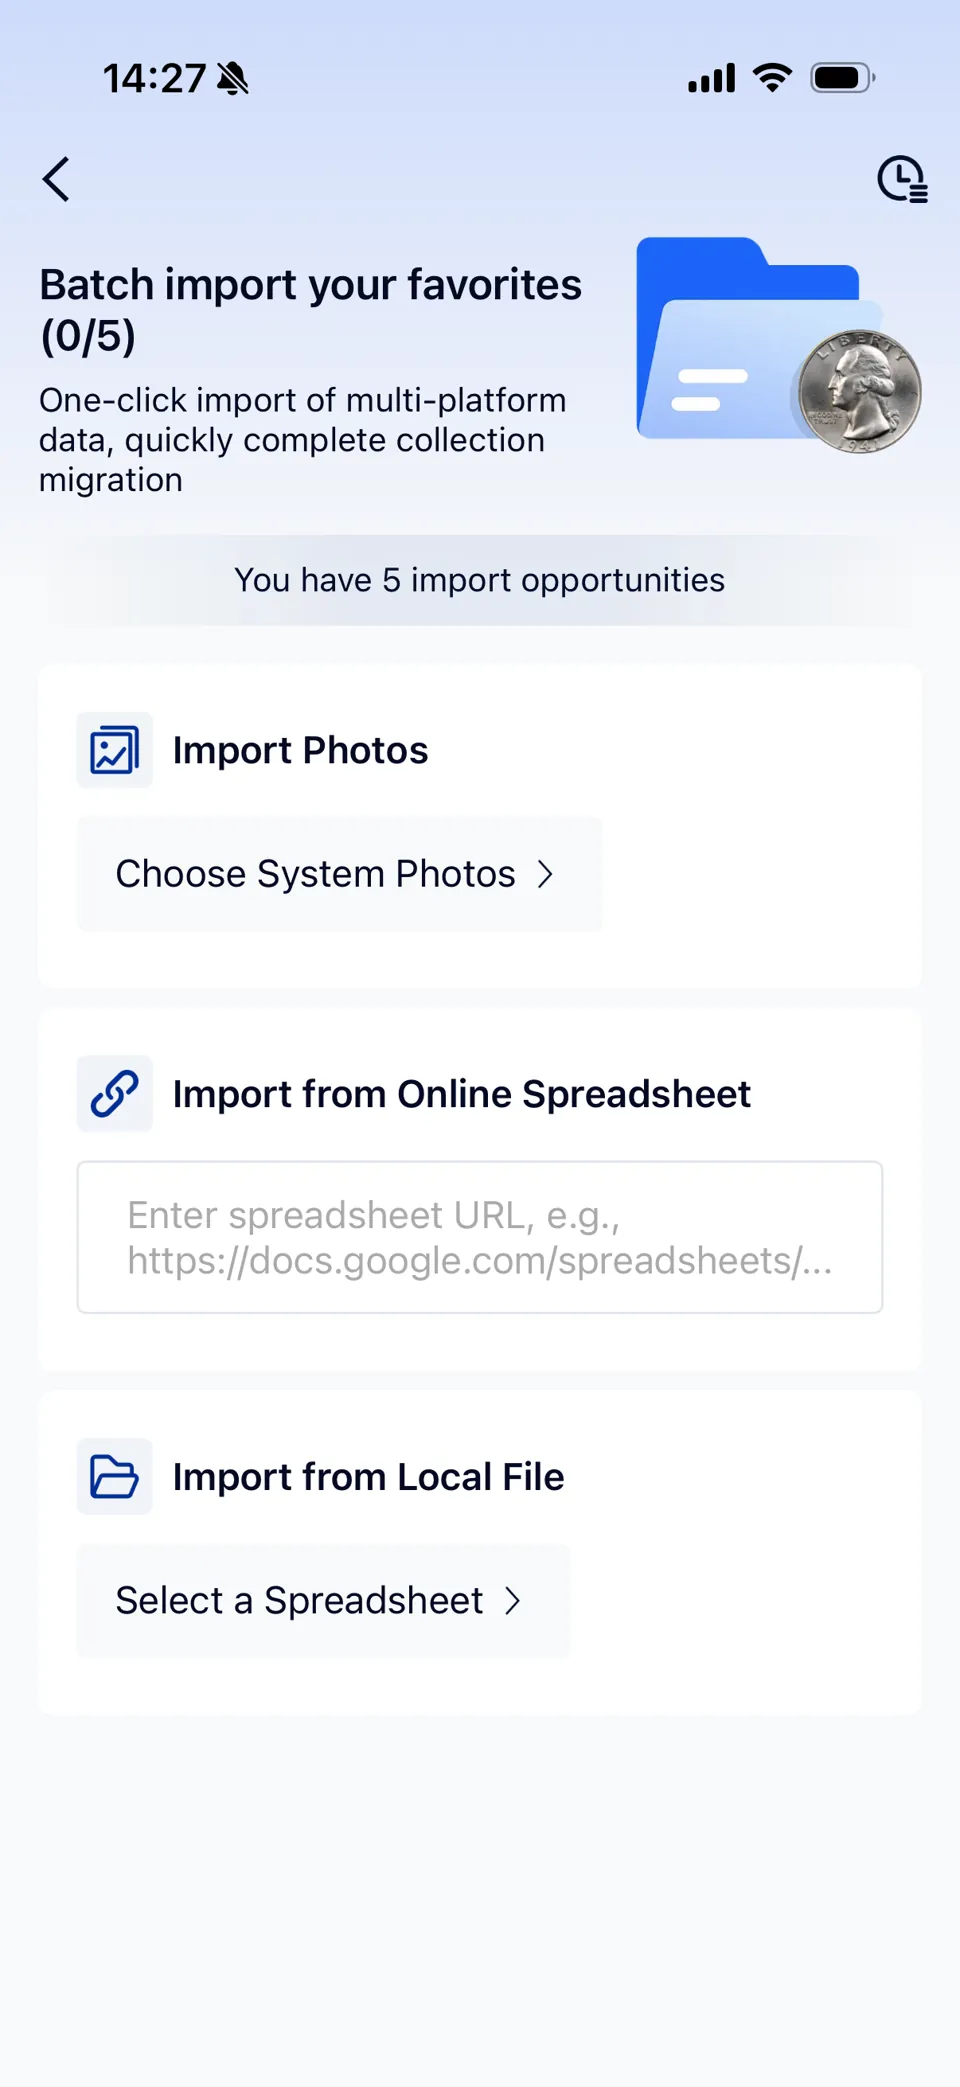
1. Choose the photo-import route
Open Collection and the batch-import control, then choose Choose System Photos. The screen also offers online and local spreadsheet routes; this case uses phone photos.
For a larger collection, prepare small, traceable groups before importing, such as one album or collecting theme at a time. This makes the resulting records easier to check.
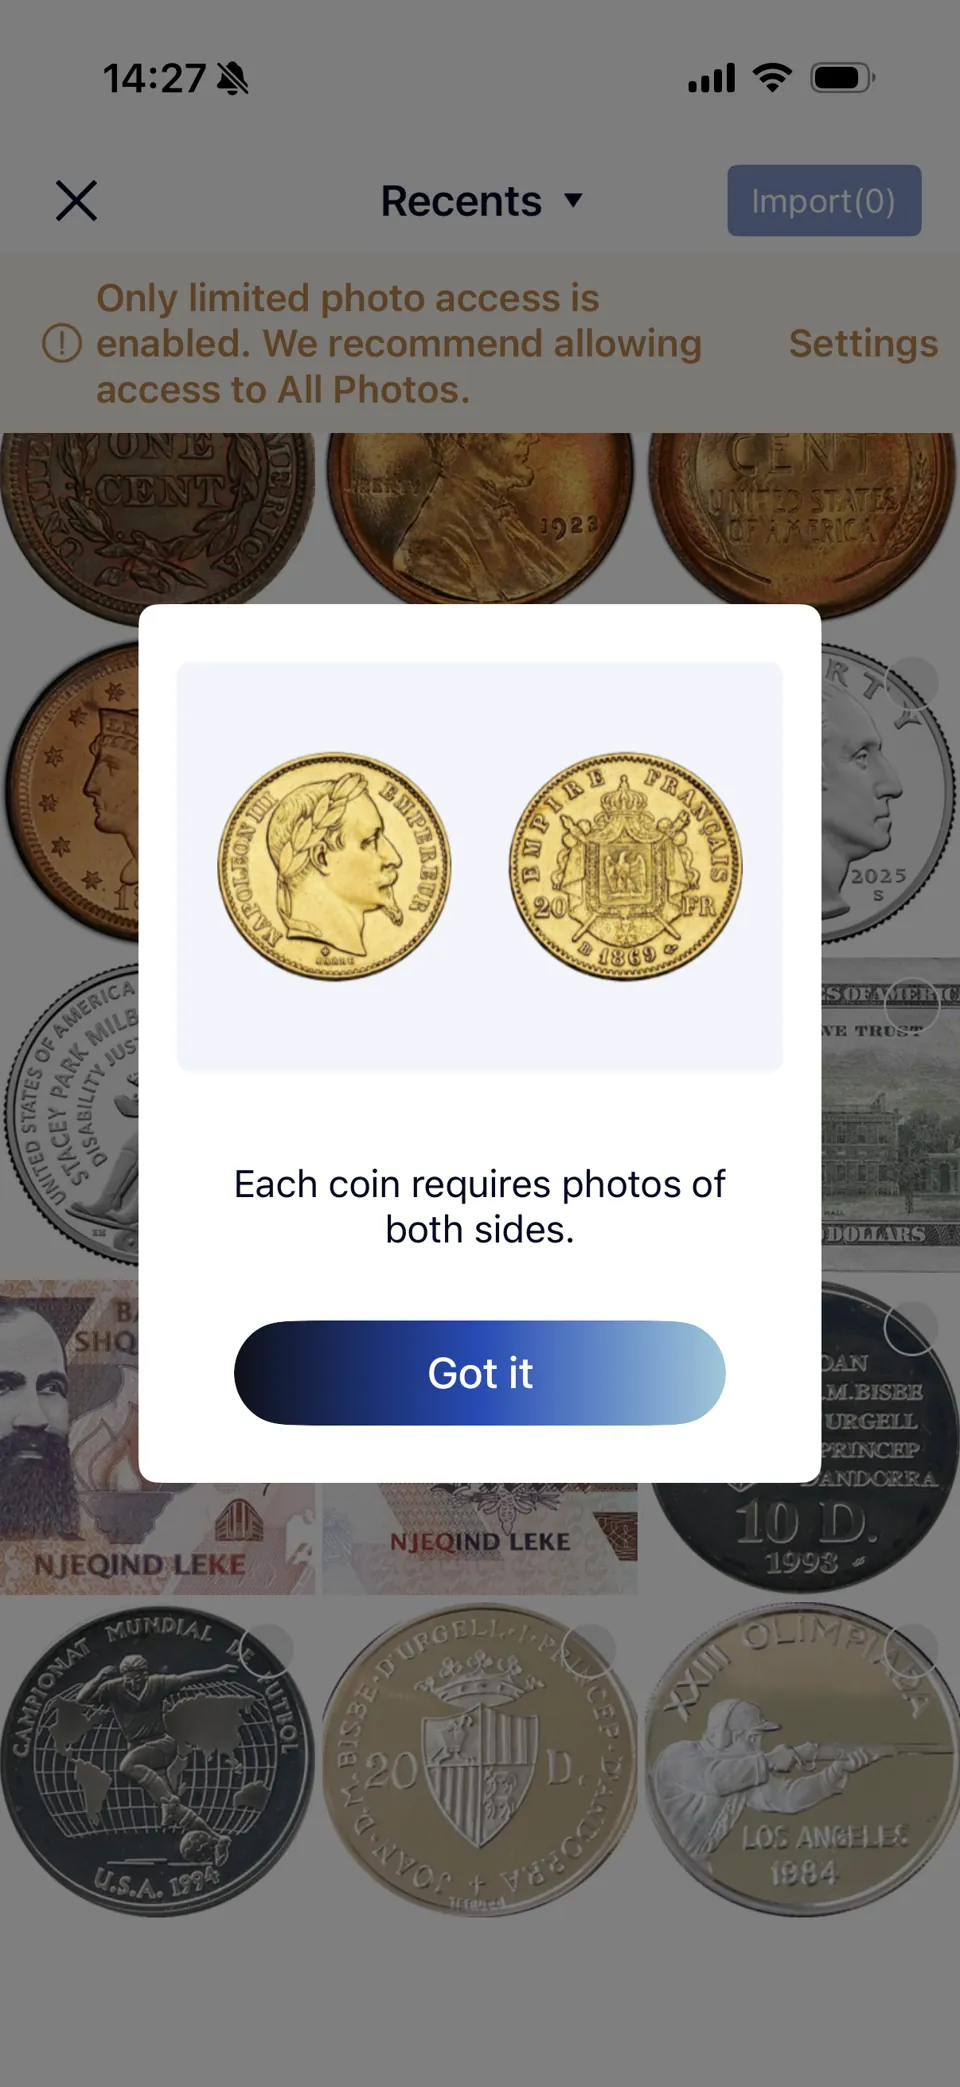
2. Prepare both sides and select the relevant photos
The prompt asks for photos of both sides of each coin. Keep the front and back of each item identifiable, and leave unrelated personal photos unselected. For banknotes, prepare clear front and back images as well.
If the picker only shows some photos, review the photo access settings and make the intended images available.
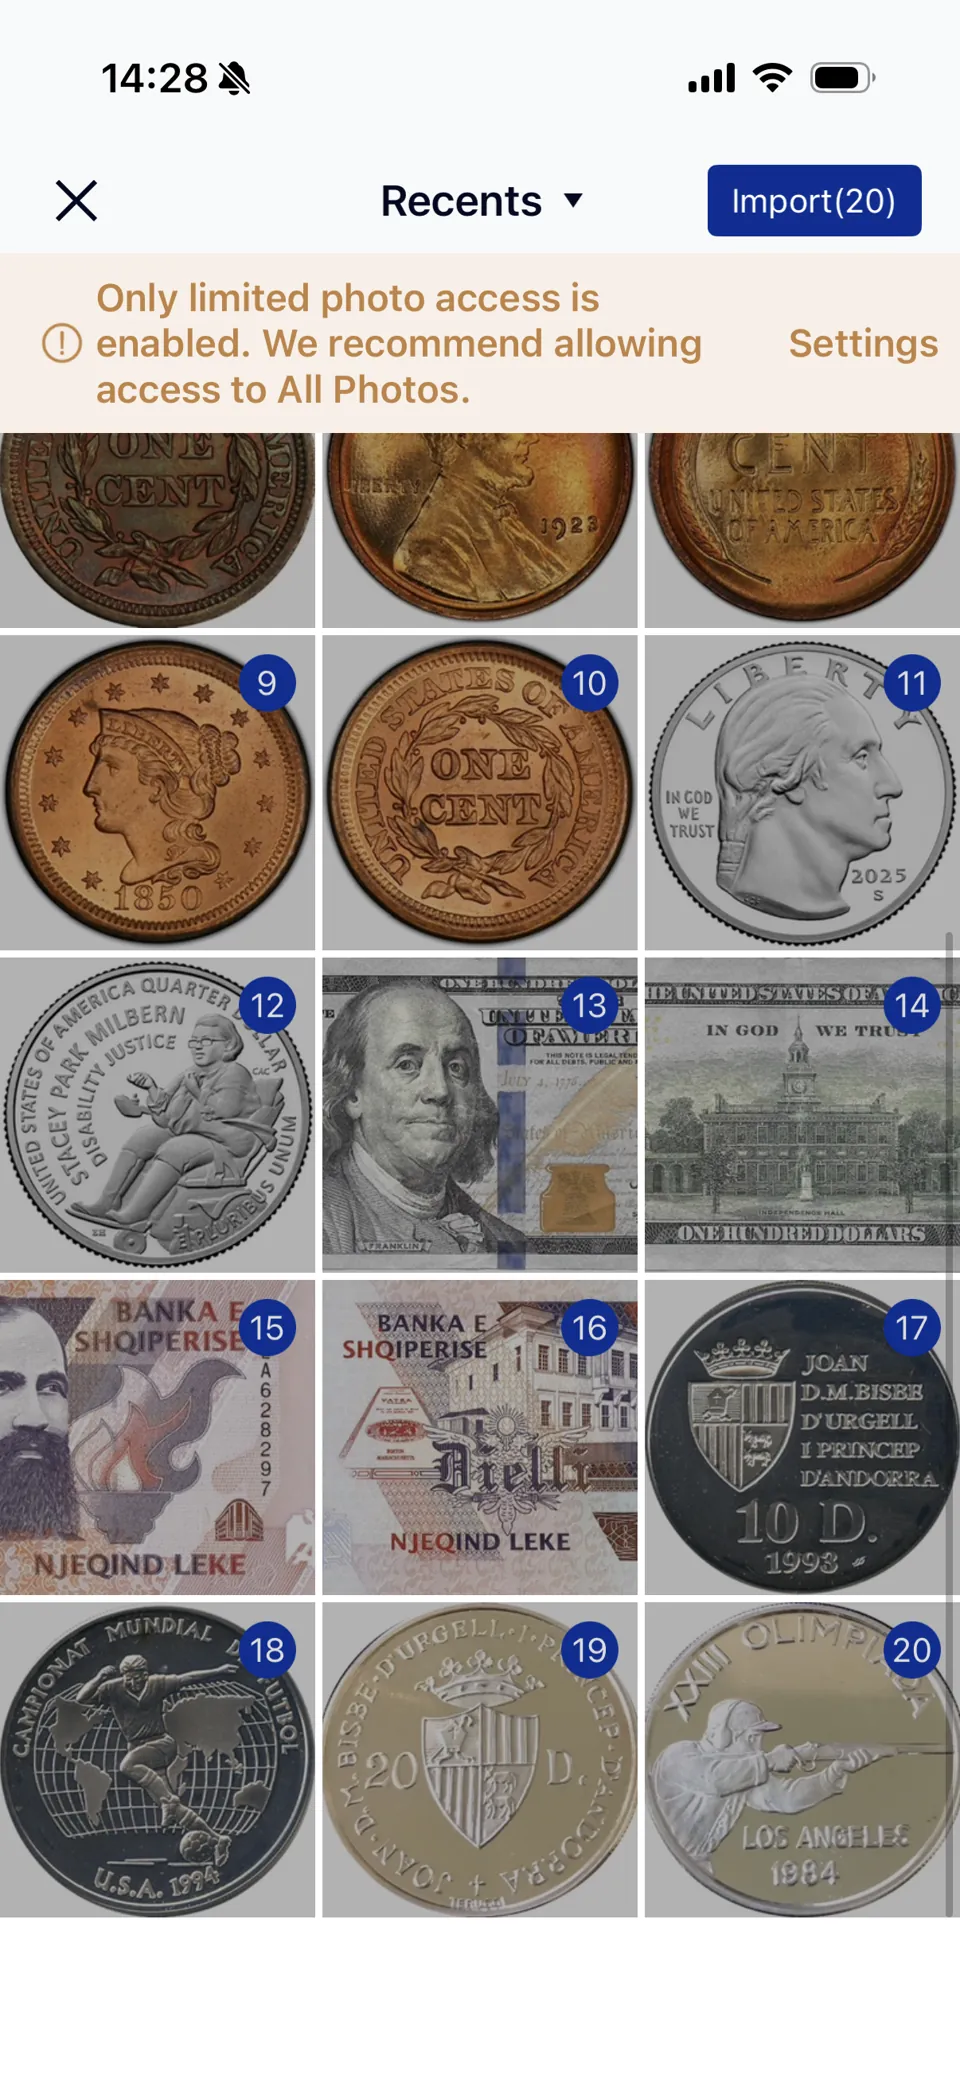
3. Check the selection before uploading
The illustrated picker shows Import (20). This is a photo-selection counter; do not use it alone to establish the number of collection records created. Check your chosen images before starting.
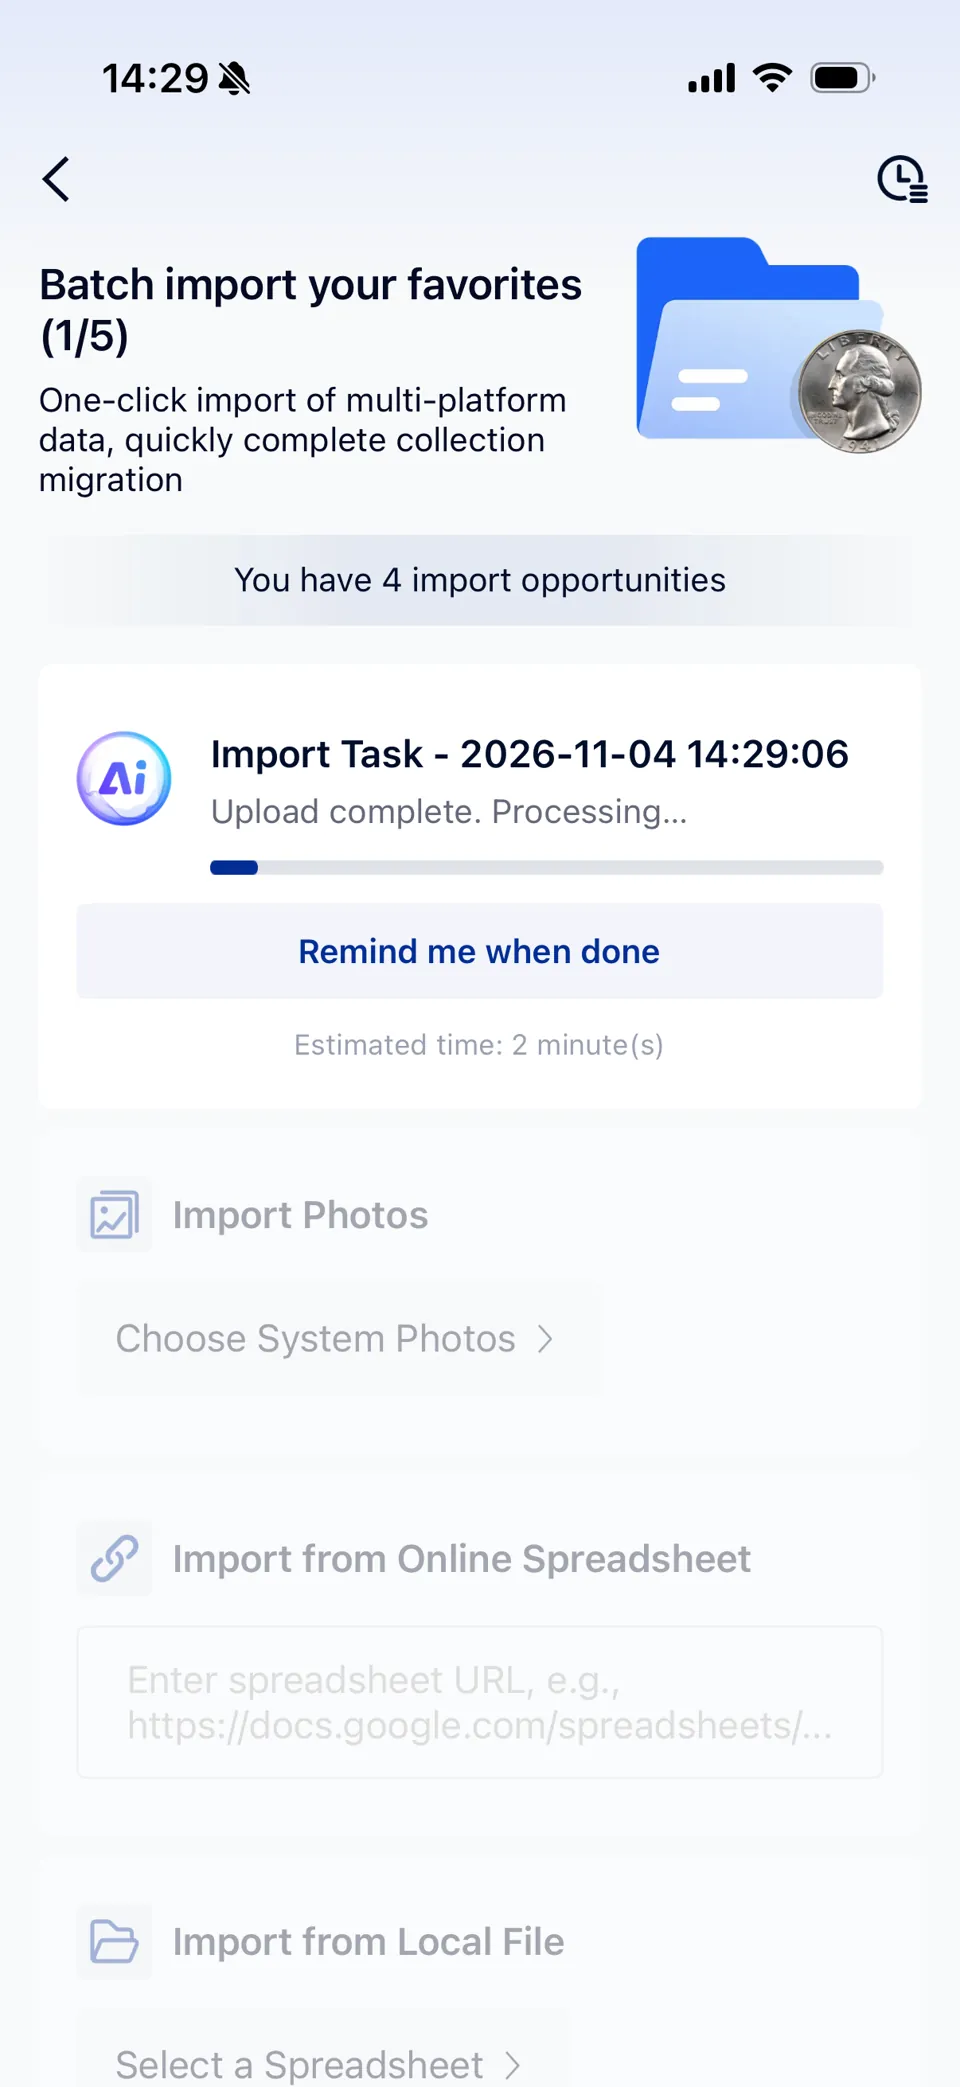
4. Distinguish upload from processing
During upload, the app instructs you not to close it. Once upload is complete, the task moves to processing; the task screen offers Remind me when done.
The screenshot shows an estimated two minutes. This is an interface estimate, not a measured completion time or a promise for every batch.
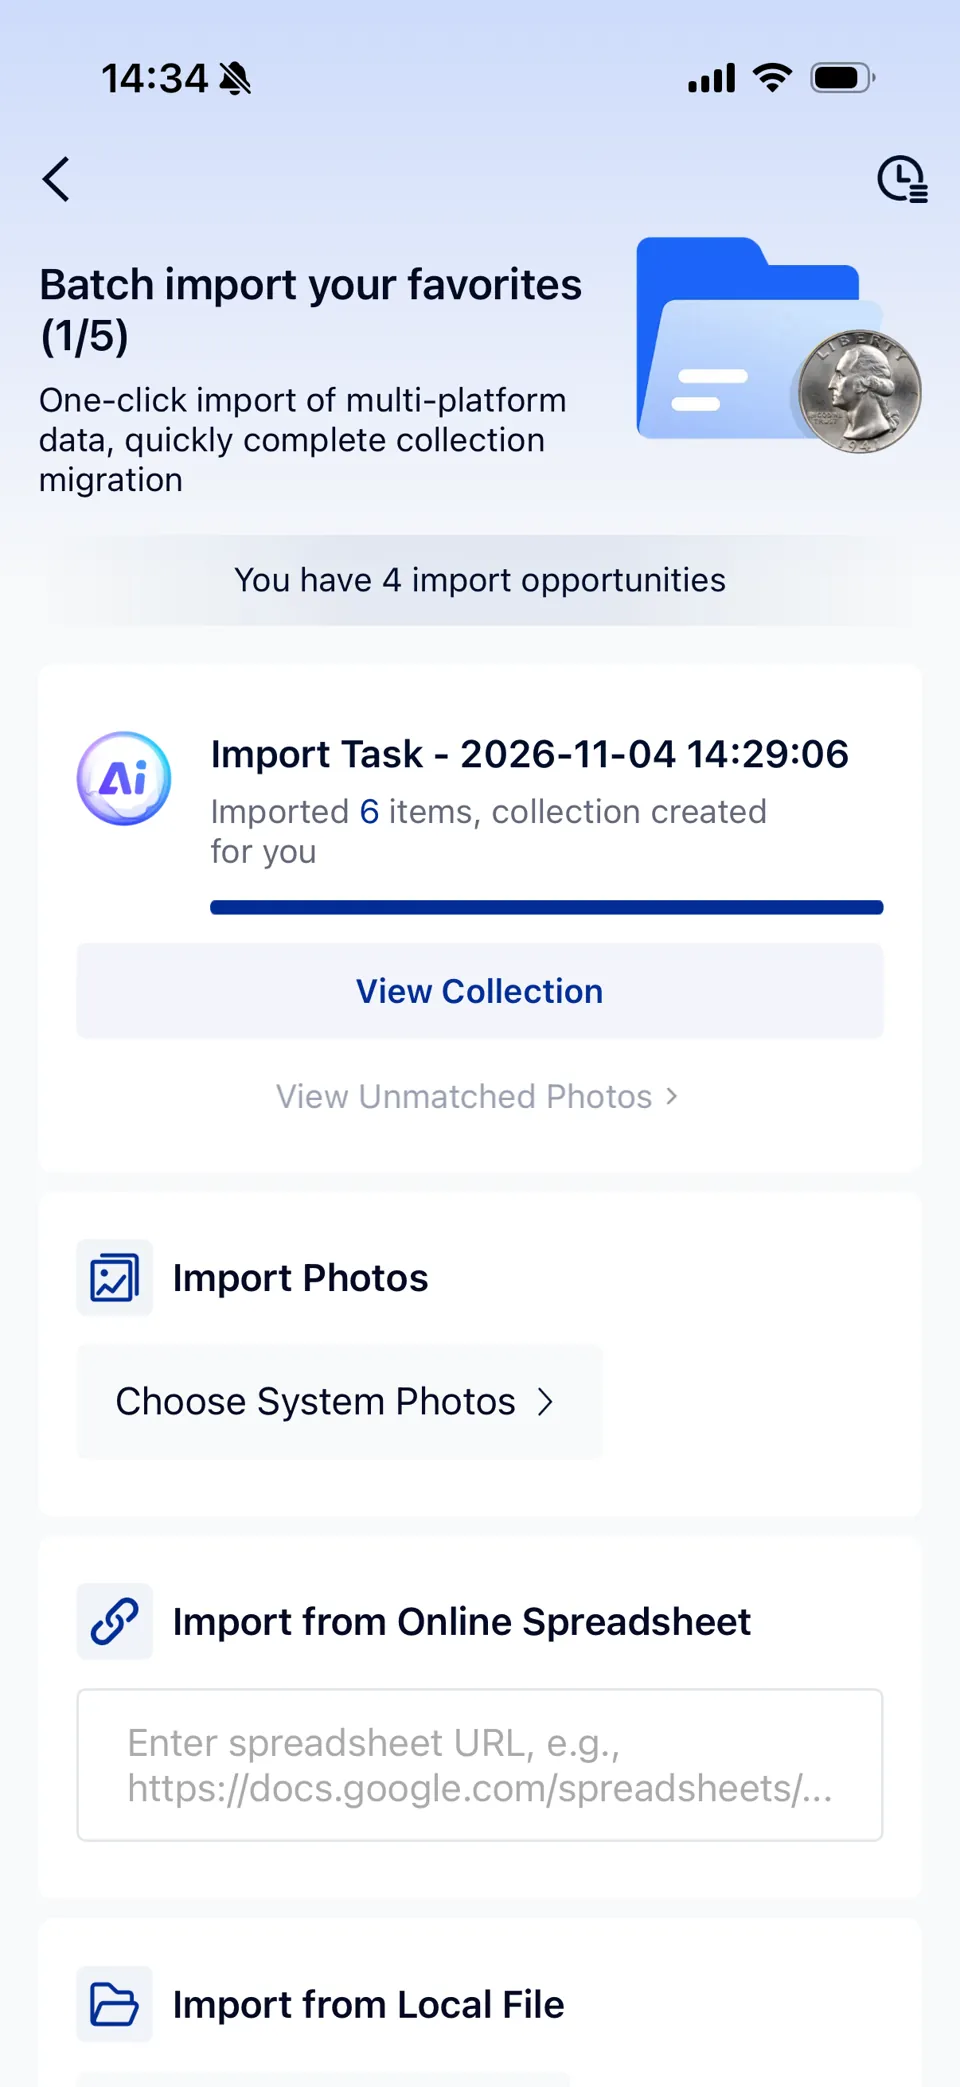
5. Open the completed task
Use View Collection after processing completes. Review any available unmatched-photo controls rather than assuming that uploading alone means every item was saved.
The owner confirmed that this operation involved 20 mixed coin and banknote items from phone photos, with 20 successfully imported and no failures or duplicates. The supplied completion screenshot displays a six-item count; it illustrates the completion controls, not independent verification of the confirmed total.
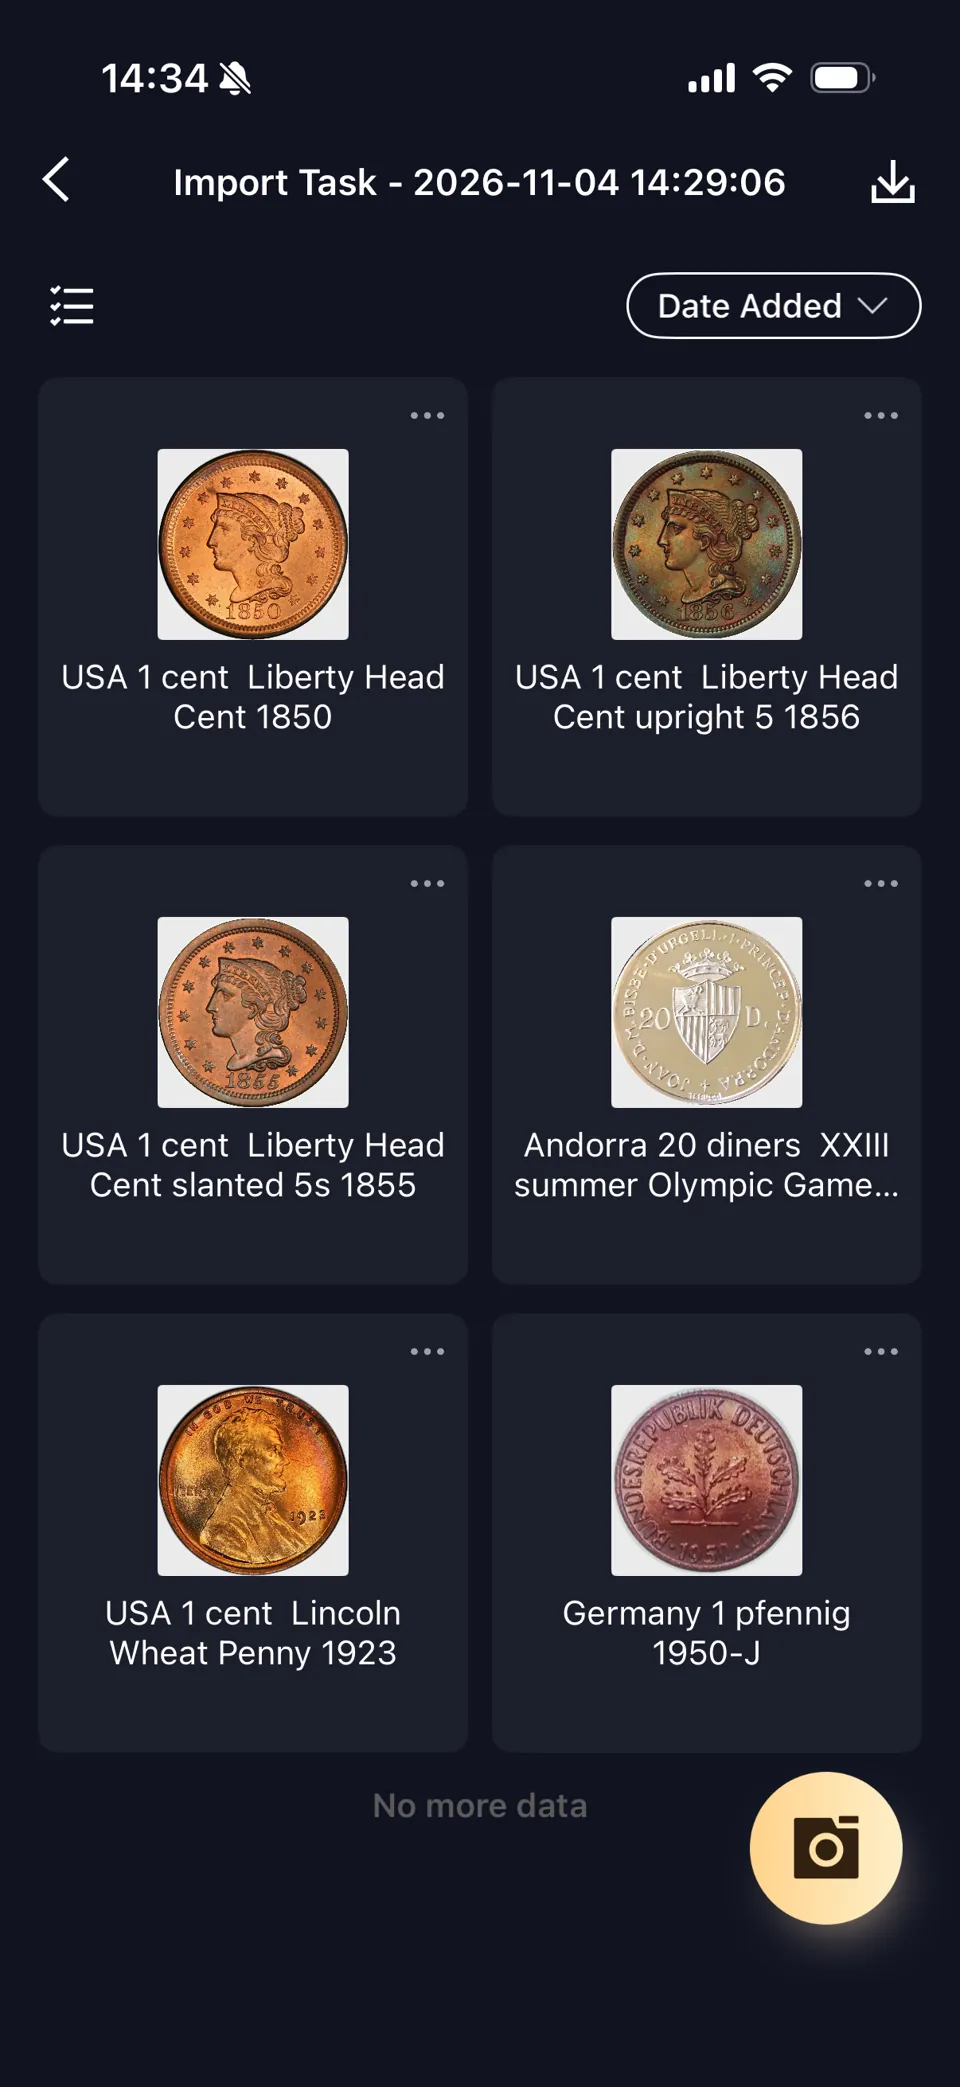
6. Review records and assign your sets
The supplied collection view shows six visible coin cards. Open records to check identity and paired images, then edit personal sets, acquisition details and costs as needed. Use your own item list to check the whole batch, including banknotes.
Practical outcome: the owner reports that all 20 items were imported successfully. This case documents a photo-import workflow; it does not establish accuracy or capacity for every collection, and no completed export file was supplied for this batch.
For the available import routes and individual collection controls, see batch import and collection steps in the user guide. After checking the imported records, continue with cost and acquisition notes and exporting an eligible collection.
Keep your collection when you change phones
Your history, subscription benefits and collection records are linked to your HeriBase account. Sign in with the same account on a replacement device, including when switching from Android to iPhone or the other way around. You do not need to rebuild the collection because you changed devices.
If records or Pro access are missing, check the account and login method, sign out and back in, and restart the app. If the problem remains, contact HeriBase support with your device, app version and relevant screenshots. For billing access, include the order reference without payment passwords.
For former HeritCoin users, see how the same account connects HeritCoin and HeriBase. Canceling renewal leaves paid features available until membership expires. Existing collections and identification history remain viewable afterward, while premium features, including export, stop.
What a useful collection record looks like
At the end of this workflow, check for six things: matching photos, a verified identity, a personal set, an honest cost entry, acquisition notes and an export copy if available. The real 1942-S example demonstrates identity, a recorded cost and a custom set; the separate screens show additional acquisition fields and the export request.
Try the workflow with one item before adding a large group. For a larger existing collection, the user guide explains batch-import options. Confirm the current file format with support before preparing a spreadsheet. Choose a subscription for features you will use, such as continued collection work and eligible exports; expert appraisal is a separate paid service.
Frequently asked questions
Does an identification automatically create an organized collection?
Open Collection and verify the saved item. Use Collect & Sell on the result and choose the collection option, then assign a personal set and maintain the record.
Can I organize both coins and banknotes?
HeriBase supports coin and banknote identification and collection management. Verify coin dates and mint marks, and banknote series and serial characters before saving. This article illustrates collection controls with existing coin screens; banknote field layouts may differ.
Should I enter the reference price as my purchase cost?
Record what you actually paid. Reference value and acquisition cost measure different things. If the cost is unknown, record that uncertainty rather than inventing an amount.
Will I lose my records when switching from Android to iPhone?
Identification history, collection records and subscription benefits follow your account across iOS and Android. Sign in with the same account and contact support if anything is missing.
What happens to my collection after my subscription expires?
Existing collections and identification history remain viewable. Premium features are unavailable after expiration, including collection export. Canceling renewal does not end benefits before the paid period expires.
Is spreadsheet export included with every plan?
The supplied Pro Center marks spreadsheet export Annual only. Check your current plan benefits before requesting an export. The email export screen shows a request, not proof that delivery has completed.
For prices, trials and billing help, see HeriBase Pricing and Subscription Guide.
Can I import a collection from phone photos?
Use Collection’s batch-import route and Choose System Photos. Prepare both sides and check the completed records. In the owner-reported example, 20 mixed coin and banknote items imported successfully with no failures or duplicates; this is a specific case, not a general success-rate claim.